
Every stitch tells a story. At Rawls-Riley Creations, embroidery is more than needle and thread, it is a way of capturing love, memories, and the joyful spirit of those we hold dear.
This Embroidery Day, we are opening the studio doors and inviting you behind the scenes into a world where kids’ personalities spark artistic visions, where each card is a tiny canvas, and where handmade gifts become lifelong keepsakes.
Whether you are curious about how these unique cards are made, dreaming of designing your own, or simply love hearing the personal tales behind the craft, this is for you.
The Heart Behind Our Designs
Our embroidered birthday cards started with a simple idea: that the people we love deserve something as unique as they are.
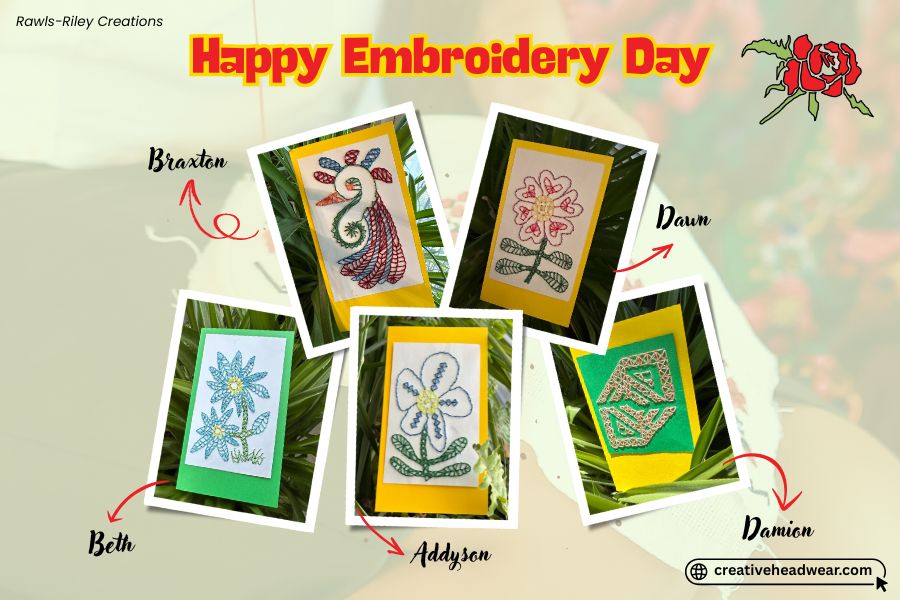
Each card in our collection has a story woven into it. For instance:
Addyson, who adores the colour blue, inspired a freeform flower design in swirling sapphire shades.
Dawn’s playful heart found its way into a delicate pink and red embroidery piece full of sweet details.
Beth, the family’s green-thumb gardener, sparked warm blue blooms reminiscent of joyful days in the garden.
Braxton’s love for red, blue, and green took an unexpected turn into a bright, spirograph-style bird, an artistic adventure that ended as a colourful chicken.
Damion, fascinated by green and geometry, inspired a stitched pathway of bold triangles bursting with movement.
These are not just birthday cards. They are snapshots of personality and passion, each made with purpose and affection. When you hold one of our embroidered cards, you are not just holding paper and thread, you are holding a piece of someone’s story.
From Sketch to Stitch
Creating these cards is both an art and a careful craft. People often ask how we turn an idea into a finished piece of embroidered art. Here’s how our process unfolds:
1. Gathering inspiration
Sometimes inspiration arrives from colours someone loves, like Addyson’s blue flowers. Other times it comes from hobbies, favourite animals, or memories shared.
2. Sketching the design
Once we have the story, we begin sketching. Each card starts as a pencil drawing on paper. The sketches are simple outlines, helping us plan how the threads will flow across the card’s surface.
3. Choosing colours and threads
Colour is a powerful storytelling tool. We select shades that capture the spirit of the person or moment. Soft pastels might evoke gentleness, while bright reds and greens speak of vibrancy and playfulness.
4. Preparing the cardstock
Our cards are not just embroidered, they are crafted to last. We use high-quality cardstock that can handle the tension of stitching without tearing. The design is lightly traced onto the card, providing a guide for needlework.
5. Stitching with care
This is where magic happens. Every stitch is placed thoughtfully, creating texture and depth. Techniques vary from simple backstitching to more intricate satin stitches and French knots, depending on the level of detail.
6. Finishing touches
After the embroidery is complete, we tidy the back of the card and ensure the stitches are secure. Sometimes we add embellishments, like tiny beads or sequins, for a hint of sparkle.
Each card is checked for neatness and quality before leaving the studio. The final piece is not only beautiful but strong enough to be treasured for years.
How to Make Hand-Embroidered Birthday Card
Inspired to try it yourself? Designing a hand-embroidered birthday card is a wonderful way to create a gift filled with love and personality. Here is a simple guide to get you started:
Step 1: Think of Your Recipient
What colours do they love?
Keep it simple but personal.
Step 2: Sketch Your Design
Lightly draw your design onto sturdy cardstock.
Start small, simple shapes or initials are perfect for beginners.
Step 3: Choose Threads and Needles
Embroidery floss works best for its wide colour range.
A small, sharp embroidery needle will glide through cardstock cleanly.
Step 4: Punch Your Holes
Use a pin or fine needle to pre-punch holes along your design lines.
This prevents tearing and makes stitching smoother.
Step 5: Start Stitching
Secure your thread at the back.
Try simple stitches like the backstitch for outlines, or satin stitch for filling shapes.
Step 6: Finish Neatly
Tie off threads at the back.
You can glue an extra piece of cardstock inside the card to hide the stitches.
A Final Thread
At Rawls-Riley Creations, embroidery is a celebration of the people we love and the stories that make them unique.
Every card begins as a spark of inspiration, a colour, a shape, a memory, and ends as a hand-stitched piece of art, ready to bring joy to someone’s special day.
Whether you choose one of our ready-made designs or dream up your own, we hope you find as much joy in these stitched stories as we do in creating them.
#rawlsrileycreations #EmbroideryDay #CreativeHeadwear #HandmadeCards #BirthdayCardProject #FamilyInspired #StitchedWithLove #TextileArt #PersonalisedGifts #CardmakingMagic #SlowCraft #BehindTheSeams #ArtInThread #GrandkidsInspire #SpirographDesign #MemoryInThread #EmbroideredCard